Arduino Planet

March 20, 2020

adafruit industries blog

Raspberry Pi Explained! #piday #raspberrypi @Raspberry_Pi

Have you ever started talking about your Pi project and have someone give you a blank stare? Here is a good introduction from Devscover Coding & Rasperry Pi:

Wayne from Devscover here, explaining the Raspberry Pi. What is it and what can you do with it? I break down the history of the Pi Foundation and the top uses for the Raspberry Pi, from the Zero to the Pi 3 and Pi 4

Learn more!


3055 06Each Friday is PiDay here at Adafruit! Be sure to check out our posts, tutorials and new Raspberry Pi related products. Adafruit has the largest and best selection of Raspberry Pi accessories and all the code & tutorials to get you up and running in no time!

by Ben at March 20, 2020 03:00 PM

Arduino Blog

Work remotely with Arduino Create — get a free upgrade now

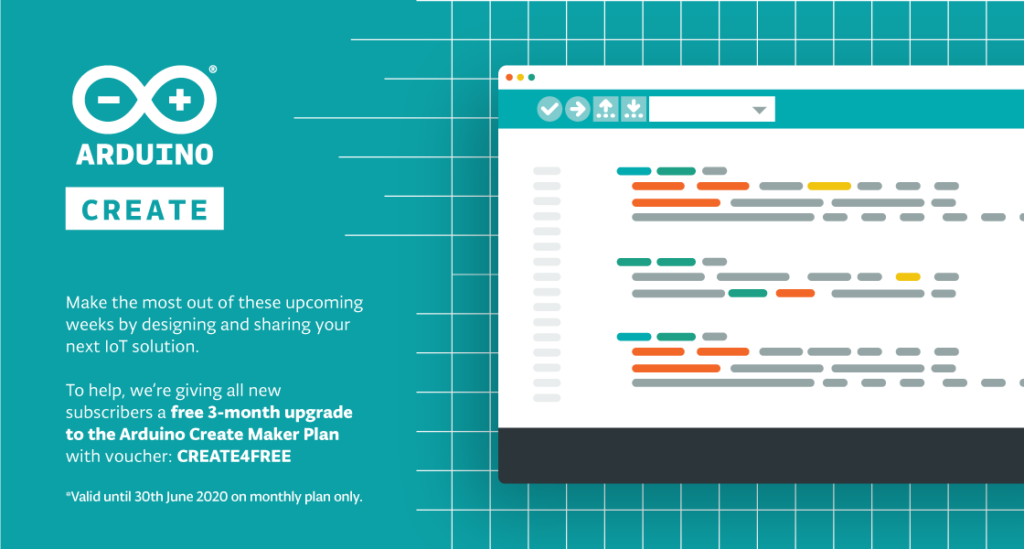
To help individuals work remotely and share their designs with team members, we’re providing a free three-month upgrade to the Arduino Create Maker plan to all 1.4 million users of Create as well as new subscribers to the service. With Arduino Create everything is ready to go; there is no need to install libraries and you can quickly share your sketch with teammates via just a URL. 

To gain your free three-month upgrade* all you need to do is go to Arduino Create choose the “Maker” plan with the default monthly option and enter the voucher code “CREATE4FREE” during the purchase process.

Arduino Create enables users to write code, access content, configure boards and share projects. Features such as an always up-to-date online IDE and the ability to share builds and receive feedback from other facilities means you can work from home efficiently and effectively. If you don’t want to start a project from scratch there’s always the option to tap into the power of the community on the Arduino Project Hub by browsing projects and making them your own. 

The ‘Maker’ plan comes with the added benefits of up to 250 sketches allowed in your sketchbook along with 200MB space to store those sketches and libraries. You can manage more connected objects (five ‘things’) with up to 20 properties per ‘thing,’ enabling the development of complete IoT solutions. Automating processes remotely is further enabled by the Maker plan including access to set up and remotely control 5 of each cloud enabled Arduino board, three cloud-enabled Linux devices, and one cloud-enabled generic third-party board.

Find out more details about Arduino Create and all the features included in the Maker plan here.

*The ‘free 3-month upgrade to Create Maker is applicable to the monthly plan and is limited to new subscribers only. Voucher code “CREATE4FREE” expires June 30th, 2020. 

Please note the first monthly payment will start three months after you purchase the plan, and you are able to cancel your subscription at any time.

by Arduino Team at March 20, 2020 02:56 PM

adafruit industries blog

Black Ice Warning System #piday #raspberrypi @Raspberry_Pi

via Black Ice Busters on instructables

Our design is a sign that illuminates when icy road conditions are possible warning drivers to proceed with caution. We have created a metal sign that is white with a blue LED snowflake design. The snowflake has evenly spaced blue lights that light up when directed by the Raspberry Pi. All of the technology will be on the back of the sign. The wiring for the lights, the relay, battery pack, Raspberry Pi, and thermometer are also on the back. The sign works in a relatively simple way. The energy from the power source will travel to the Raspberry Pi system turning it on. The Raspberry Pi will use its programming to control the DHT11 sensor that will read the air temperature. Once the temperature is below 35 degrees Fahrenheit (or one degree Celsius), the Raspberry Pi will send a signal to the lights and turn them on causing the sign snowflake to light up with blue lights.

Read more.


3055 06Each Friday is PiDay here at Adafruit! Be sure to check out our posts, tutorials and new Raspberry Pi related products. Adafruit has the largest and best selection of Raspberry Pi accessories and all the code & tutorials to get you up and running in no time!

by Takara at March 20, 2020 01:00 PM

SparkFun Electronics News

Basic Kits for Raspberry Pi 4

Hello, everyone! We are back with another Friday Product Post and this week we have four new products to showcase. We lead the week off with two brand new Raspberry Pi 4 kits that provide you with the basics needed to get the Pi up and running. Next, we have the controller:bit carrier board and micro:arcade kit, both able to to control games and robotics with your micro:bit.


Before we take a closer look at this week's new products we also wanted to let you know about our new "Today's Deals" page that can be found at the upper right hand of any SparkFun page. If you are ever curious about what this week's special deal is, as well as any additional special sales we have during the week, that's where you can find it!


The basics of RPi in a single box

SparkFun Raspberry Pi 4 Basic Kit - 2GB

SparkFun Raspberry Pi 4 Basic Kit - 2GB

KIT-16383
$74.95
SparkFun Raspberry Pi 4 Basic Kit - 4GB

SparkFun Raspberry Pi 4 Basic Kit - 4GB

KIT-16384
$89.95

The Raspberry Pi 4 Basic 2GB Kit and 4GB Kit include everything you'll need to get up and running with the new Raspberry Pi 4. The Pi 4 moves to a MicroHDMI Connector for monitors and a USB Type C connector for powering the board. Inside the kit you will find a MicroHDMI to HDMI cable and USB Type-C Wall Adapter - two things needed to run the Pi that you probably didn't have sitting around already. The wall adapter provides 15.3W of power, enough to properly power the Pi and most projects.


SparkFun controller:bit - micro:bit Carrier Board (Qwiic)

SparkFun controller:bit - micro:bit Carrier Board (Qwiic)

DEV-16129
$10.95

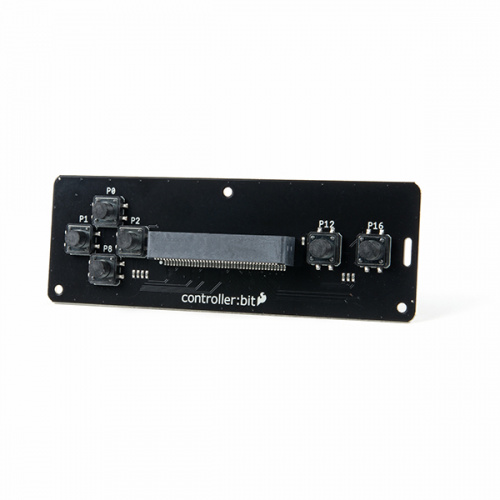
The SparkFun controller:bit is a fun-filled "carrier" board for the micro:bit that, when combined with the micro:bit, provides you with a fully functional controller system. Designed in a similar form factor to the classic Nintendo controller, the controller:bit is equipped with a four-direction "D-pad" on the left side of the board and two action buttons on the right side of the board. The two push buttons on the micro:bit in the center function as "start" and "select," to complete the NES controller form factor.


SparkFun micro:arcade kit for micro:bit v2.0

SparkFun micro:arcade kit for micro:bit v2.0

KIT-16403
$49.95

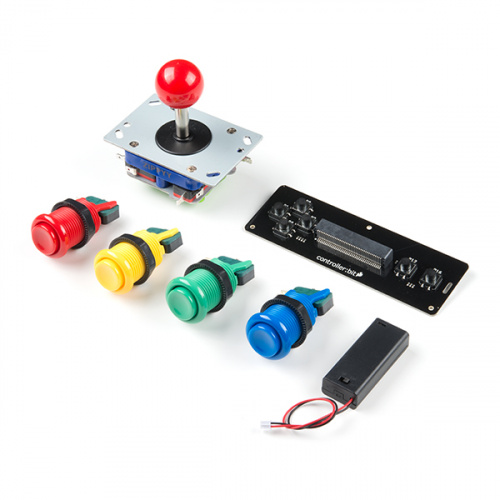
We love games! We love writing games, building games and yes, even building game consoles. That's where the SparkFun micro:arcade kit v2.0 for the micro:bit comes in! The kit includes our controller:bit carrier board. With the micro:arcade kit v2.0 you will be able to turn a classic controller into an arcade cabinet by connecting just a few buttons and switches.


That's it for this week! As always, we can't wait to see what you make! Shoot us a tweet @sparkfun, or let us know on Instagram or Facebook. We’d love to see what projects you’ve made!

Never miss a new product!

comments | comment feed

by Chris McCarty at March 20, 2020 12:00 PM

adafruit industries blog

Working from Home? This Calendar-Controlled “Busy” Light Project May Help @Raspberry_Pi #PiDay #RaspberryPi

from Jim Bennett via hackster.io

One of the upsides of working from home, especially when my 7 year old is off school is that I am available most of the time for the occasional quick cuddle, to laugh at something silly she’d just done or help her with something. One of the downsides is that at any time she could walk in to my office whilst I’m on a call.

What I need is a on-air style light, to let her know when I’m in meetings and when I’m not. Luckily I’m an IoT nut so I not only have the skills to build such a thing, but I have all the parts just lying around begging me to use them! So I built one!

by Zay at March 20, 2020 11:00 AM

March 19, 2020

Dangerous Prototypes

Building my own 50Ah LiFePO4 lithium battery pack

Kenneth Finnegan posted his DIY 50Ah LiFePO4 lithium battery pack build:

Several years ago, I had purchased a 20Ah 12V Lithium Iron battery pack from Bioenno for my various 12VDC projects. To help protect it, I ultimately built it up into a 50cal ammo can with a dual panel-mount PowerPole connector on the outside, which has proven really nice as far as battery boxes go:
*20Ah is a decent battery capacity for a small load
*The packaged Bioenno pack left some space inside the box to also store the charger it came with, some PowerPole accessories, etc
*The fact that you’re able to close up the box and use the power connectors on the outside once you’re using it is real nice

More details on The life of Kenneth blog.

by DP at March 19, 2020 11:52 PM

Evil Mad Scientist Laboratories

Sheltering in place

Picture of shop door with closure sign on it.

We started Evil Mad Scientist Laboratories in 2006 as a “personal project blog”, to capture, organize, and share some of the things we do for fun. It has evolved over time to become a resource for our customers as well as a way for us to share interesting and educational information from a variety of sources. It also gradually become our livelihood, as the hobby projects started to take over more and more of our lives.

Right now, we want to let you know where we’re at. Here in Santa Clara County (the south end of the San Francisco Bay Area), we are under a Shelter in Place order due to COVID-19. Windell and I are working from home, and checking in on Zener at the shop regularly. We’re bringing work home with us, and have even been able to start shipping some orders again. Our employees cannot come in, which means that assembly, kitting, packing and shipping have slowed to what the two of us can do.

We’ll be doing our best to communicate with our customers about their orders and we’re doing tech support and customer service as usual. Orders will likely be going out every few days instead of every day. Some items will not be restocked as quickly.

As we work through these details, there are a lot of resources here on the blog that may be useful to all of you doing your part by staying at home.

We have many tutorials for projects that can be made from things you can find around the house. We have lots of cooking projects, some of which are also math or science projects. We have a series of basics articles you may enjoy for people getting started in electronics. And our linkdumps have lots interesting links to occupy your time.

We want you all to stay safe and healthy! Please reach out to us if you have questions, concerns, blog post ideas, or pictures of projects that we may have helped you instigate!

Thank you all for being such a great community, such amazing customers, and sharing with and helping each other so generously!

by Lenore Edman at March 19, 2020 07:23 PM

Arduino Blog

VersaTouch brings touch localization and force sensing to everyday surfaces

Researchers from the University of Auckland in New Zealand’s Augmented Human Lab are exploring a new way to construct interactive touch surfaces using finger-mounted audio transducers. 

VersaTouch — which works on everyday surfaces — uses one or more receivers to measure sound waves emanating from the wearer’s “augmented” fingers, allowing it to calculate their positions and/or movements. The plug-and-play system can also sense force based on a changing audio signature and track individual digits by alternating each one’s sonic outputs. 

Importantly, VersaTouch can be configured without permanent modification to the newly interactive surface. The setup includes an Arduino Due to receive signals, a Teensy 3.6 to control the transducers, and a MacBook to process the data and calculate the touch positions with a Java program.

More information on the project can be found in the team’s research paper, and you can see it demonstrated in the video below. 

VersaTouch is a portable, plug-and-play system that uses active acoustic sensing to track fine-grained touch locations as well as touch force of multiple fingers on everyday surfaces without having to permanently instrument them or do an extensive calibration. Our system is versatile in multiple aspects. First, with simple calibration, VersaTouch can be arranged in arbitrary layouts in order to fit into crowded surfaces while retaining its accuracy. Second, various modalities of touch input, such as distance and position, can be supported depending on the number of sensors used to suit the interaction scenario. Third, VersaTouch can sense multi-finger touch, touch force, as well as identify the touch source. Last, VersaTouch is capable of providing vibrotactile feedback to fingertips through the same actuators used for touch sensing.

by Arduino Team at March 19, 2020 06:18 PM

SparkFun Electronics News

Enginursday: A Qwiic Comparison of Temperature Sensors

It all started when I wanted to measure the ambient temperature of a room at SparkFun. But what is the best option? Well, it depends on what you are looking for in your project. Let's compare three temperature sensors from the SparkFun catalog!

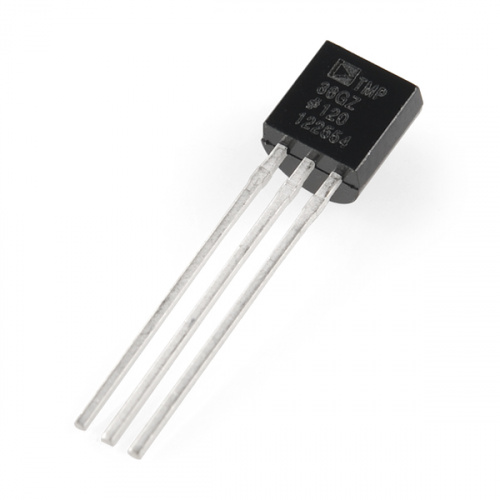
Temperature Sensor - TMP36

Temperature Sensor - TMP36

SEN-10988
$1.50
16
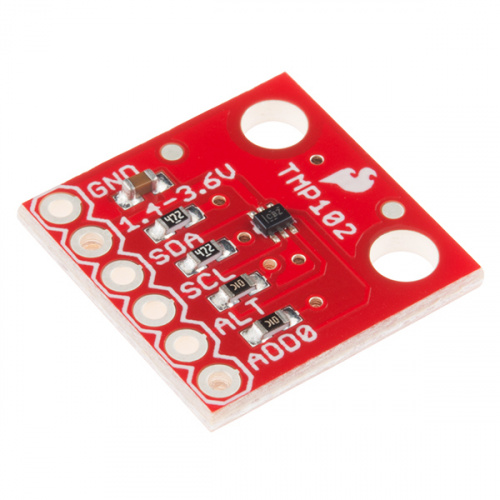
SparkFun Digital Temperature Sensor Breakout - TMP102

SparkFun Digital Temperature Sensor Breakout - TMP102

SEN-13314
$5.95
4
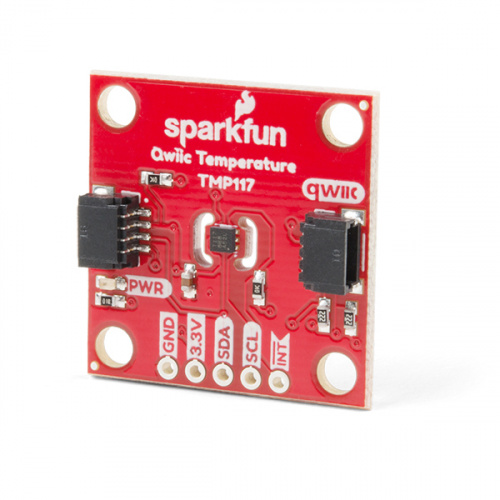
SparkFun High Precision Temperature Sensor - TMP117 (Qwiic)

SparkFun High Precision Temperature Sensor - TMP117 (Qwiic)

SEN-15805
$13.95
1

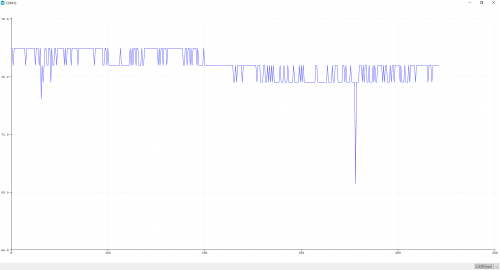
My initial choice was to grab the TMP36 from my parts kit. It only required three connections and an analog pin. However, after viewing the output, I noticed a majority of the time that the temperature would jump 1°F to 2°F. At other times, the value would spike. Unsatisfied, I placed the project off to the side as this would require a bit more planning to average the values and add additional parts in order to throw out the errors.

TMP36 Output on the Arduino Serial Plotter

Click image for a closer view.

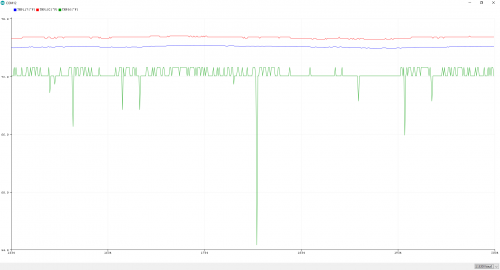
The project sat there on my desk for a bit until I noticed the TMP117 high precision digital temperature sensor in the catalog. I thought it would be a good opportunity to revive the project and see if I could obtain more stable readings using a different temperature sensor. I decided to compare the TMP36 against the TMP102 and TMP117. I wrote some code [1] to output the readings to the Arduino Serial Plotter.

Looking at the TMP102, it performed better than the TMP36 when measuring the ambient temperature of the room. The temperature readings remained stable and it was not as noisy. The temperature readings for the TMP117 performed better than the TMP102 and TMP36. The data points were more smooth and less prone to noise.

TMP117 vs TMP102 vs TMP36

Click image for a closer view.

Good, Better, Best?

So, you might ask, which of the three temperature sensors is the best? Well, that really depends on how you plan to use it. In my opinion, the Qwiic TMP117 is a winner. The sensors performed as expected when looking at the datasheet. The board did not require any soldering. There was no additional circuitry or code needed to average the temperature sensor readings. The power supply did not cause as much of a fluctuation with the digital temperature sensors like it did with the analog temperature sensor.

The TMP102 could work as well if I was not looking for such a precise temperature reading. While it is not as expensive as the TMP117, it does require some soldering for this version of the TMP102 board. The TMP36 is good but it would require a bit more effort to filter out the errors.

[1] Note: Looking for the hookup and example code to compare the three temperature sensors? Check out the tutorial!

New!

Temperature Sensor Comparison

March 18, 2020

A comparison of analog and digital temperature sensors. Which is better?

What is your favorite temperature sensor to work with in your projects? Until next time - I'm off to build my digital indoor thermometer!

comments | comment feed

by Bobby Chan at March 19, 2020 01:00 PM

March 18, 2020

Dangerous Prototypes

Low cost open source ventilator

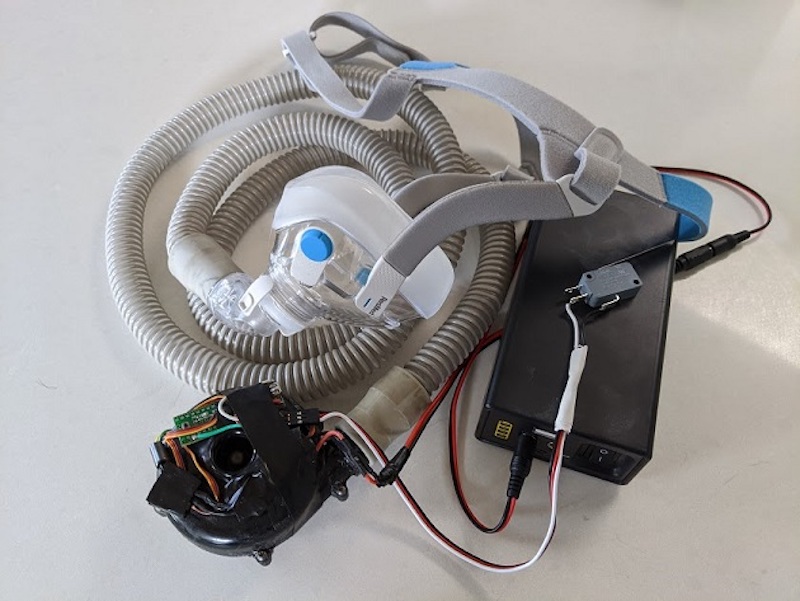
Johnny Chung Lee writes, “In the event that COVID-19 hospitalizations exhaust the availability of FDA approved ventilators. I started documenting a a process of converting a low-cost CPAP (Continuous Positive Airway Pressure) blower into a rudimentary Ventilator that could help with breathing during an acute respiratory attack. If interested, follow along the Github Project

More details on Procrastineering blog.

by DP at March 18, 2020 11:49 PM

NYC Resistor

Arduino: Sensors and Input/Output on Sat, Mar 28

Arduino: Sensors and Input/Output is taking place at NYC Resistor on Sat, Mar 28. Tickets are available on Eventbrite.

Want to get started with physical computing?

Get your tickets on Eventbrite.

by Classes at March 18, 2020 05:00 PM

SparkFun Electronics News

SparkFun’s Deal of the Week

Hi everyone! We’re pretty excited to do more of a “grand opening,” if you will, of our new Sales page. All current and ongoing sales and promotions will get to live in one fancy new hub.

alt text

This is great for a few reasons:

  1. Weekly deals! If you haven’t subscribed to our newsletter, go do that and stay up-to-date with the latest and greatest. It’s where we will announce each week what the Weekly Deal will be. So like, go now. Sign up below.
  2. You will be able to easily see what special sales or promotions are running.
  3. Who doesn’t want an all-in-one hub for stuff on sale?

Now, some of you may be wondering, but what about the sale category listed on the navigation bar? Good question. You can still go there, but anything and everything that is on sale will live under that category. The new sales page allows you to quickly see what the short-term specials are without having to sort through the pages of sale items. Basically the sale page is any special, short-term sale or promotion.

Happy saving!

Never miss a new product!

comments | comment feed

by Hailey Blessing at March 18, 2020 01:00 PM

March 17, 2020

Dangerous Prototypes

Looking inside a vintage Soviet TTL logic integrated circuit

Ken Shirriff examines a 1980s chip used in a Soyuz space clock:

The clock is built from TTL integrated circuits, a type of digital logic that was popular in the 1970s through the 1990s because it was reliable, inexpensive, and easy to use. (If you’ve done hobbyist digital electronics, you probably know the 7400-series of TTL chips.) A basic TTL chip contained just a few logic gates, such as 4 NAND gates or 6 inverters, while a more complex TTL chip implemented a functional unit such as a 4-bit counter. Eventually, TTL lost out to CMOS chips (the chips in modern computers), which use much less power and are much denser.

More details on Ken Shirriff’s blog.

by DP at March 17, 2020 11:57 PM

Arduino Blog

Designing a low-cost, open source ventilator with Arduino

Desperate times call for desperate measures, and while making your own medical equipment isn’t normally advisable, Johnny Lee’e project explores how to turn a CPAP machine into a ventilator.

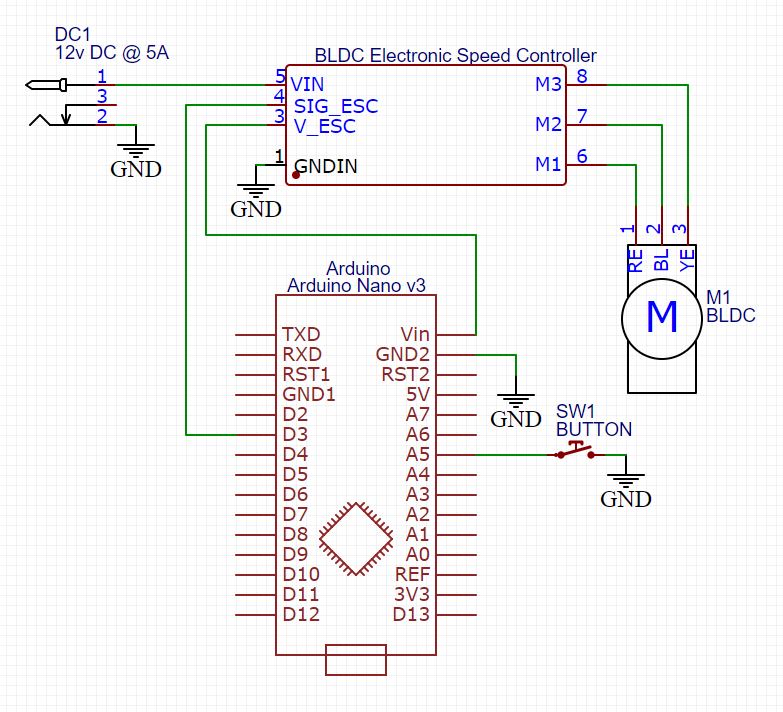
The idea is that since these machines are basically just blowers controlled by a brushless DC motor, an Arduino Nano equipped with an electonic speed controller could allow it to act as a one.

Such a setup has been shown to provide more than enough pressure for a ventilator used on COVID-19 patients. This device has in no way been evaluated or approved for medical use, but it does provide a starting point for experimentation.

You can find additional details, including an air filtration system, on Lee’s GitHub page.

by Arduino Team at March 17, 2020 05:54 PM

March 13, 2020

mightyOhm

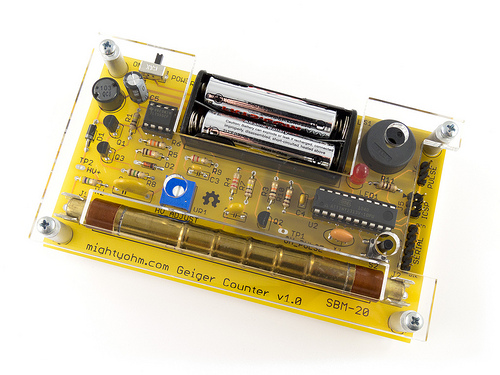
Self-quarantine Sale! Geiger Counter Kits are 20% off for the next 30 days!

With the spread of COVID-19, many folks are stuck at home for a variety of reasons. This is a great time to practice social distancing (Seattle, we got this), stay home, be safe, and work on those projects you’ve been putting off.

For folks looking for a fun new project, Geiger Counter kits are 20% off for the next month. The full bundle (kit + case + SBM-20 Geiger tube) is normally $99.95, but for the next 30 days it will be $79.95 + shipping.

You can place an order here. Be sure to select the full bundle to get the sale price!

Supplies are limited!

by Jeff at March 13, 2020 06:27 PM

March 12, 2020

NYC Resistor

Intro to Soldering Workshop: Make an LED Tile on Sun, Mar 22

Intro to Soldering Workshop: Make an LED Tile is taking place at NYC Resistor on Sun, Mar 22. Tickets are available on Eventbrite.

Soldering is one of the most important skills you’ll need for working with electronics. Come join us for an introductory through-hole soldering workshop. Soldering enables you to create sturdy connections between electrical components.

Get your tickets on Eventbrite.

by Classes at March 12, 2020 06:00 PM

ONLINE: Pom-Pom and Tassel Make-along on Sun, Mar 22

ONLINE: Pom-Pom and Tassel Make-along is taking place at NYC Resistor on Sun, Mar 22. Tickets are available on Eventbrite.

Stuck at home? This online make-along will show you how to make your own pom-poms and tassels. No special tools required.

Get your tickets on Eventbrite.

by Classes at March 12, 2020 05:00 PM

February 22, 2020

Evil Mad Scientist Laboratories

Open Hardware Summit 2020

Alicia Gibb, Ayah Bdeir, Kate Hartmann, Lenore Edman at OHS 2011Photo from OHS 2011 by Jacob Gibb

The tenth annual Open Hardware Summit will be in New York held online on March 13. I’ll be participating in a panel looking back at the past ten years of open source hardware and looking forward to the next decade as well. The schedule is filled with great speakers and I’m looking forward to seeing so many friends, old and new.

Note: the session has been turned into a podcast so you can listen at your leisure!

Edited March 11 to reflect the change to online.
Edited March 18 to add podcast link.

by Lenore Edman at February 22, 2020 07:17 PM

February 16, 2020

mightyOhm

Mike and Key ARC Swap Meet March 7th, 2020

The 39th annual Mike and Key ARC Swap Meet will take place on Saturday, March 7th, 2020 at the Washington State Fairgrounds in Puyallup.

This is one of my favorite ham radio events in the Seattle area and I’ll be there again this year, hopefully with a seller’s table (still waiting on confirmation).

Edit: I won’t be attending after all. Seattle has been significantly impacted by COVID-19 and King county is discouraging people from attending events with large groups of people.

by Jeff at February 16, 2020 06:58 AM

January 31, 2020

adafruit industries blog

An analog binary infinity mirror clock using RGB LED strips #NeoPixels #Dotstars #ShowAndTell @bamapookie

This week Shawn Kovalchick came by the Adafruit Show and Tell to demonstrate an analog binary infinity mirror clock.

The original plan was to create an analog binary clock, but I had no idea how to do it.  To make it like a regular clock, I would have needed to have 11 hands, which didn’t seem doable.  A loooong while later, I had the inspiration to use DotStars or NeoPixels to represent the hands, and the infinity mirror effect would make the LEDs appear to be lines, further adding to the hand effect.

Shawn credited the Ruiz Brothers and their infinity coasters for inspiration. (Ed: I love how sharing ideas can be so creative)

You can see the details on Shawn’s Hackaday.io project page. Super work!

Come by the Adafruit Show and Tell and show your projects every Wednesday 7:30 PM US Eastern time.


by Anne Barela at January 31, 2020 02:32 PM

January 30, 2020

Evil Mad Scientist Laboratories

January 29, 2020

adafruit industries blog

Tearing Down a Cheap Single-Color LED Matrix Bracelet on Twitter #LEDs #teardown @GeekMomProjects

I love it when people post a project they’re working on or a tear down they’re trying to figure out on social media and other makers lend a hand in offering advice and figuring things out. Such was the case recently on Twitter when Debra of Geek Mom Projects posted a video of a cheap LED matrix bracelet and wondered if it was hackable.

As she began posting images of her tear down and what she was finding, other people began sharing what they knew. Someone even helpfully unrolled the thread via a thread reader.

by gareth branwyn at January 29, 2020 02:00 PM

January 14, 2020

mightyOhm

Rescue Shield Kits (PCBs + components) are back in stock!


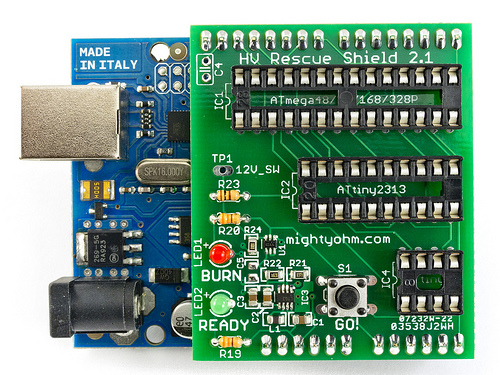
I sold out of Rescue Shield kits just after the holidays. Fortunately, new PCBs and components arrived last week. Hooray for no back-ordered components this time! What used to be the norm is now the exception. (Technically, green LEDs did ship a week later than the rest, but as I was still busy soldering boards it didn’t affect the overall lead time to produce kits.)

I’m happy to announce that kits are back in stock now.

You can order one on the Rescue Shield kit page.

by Jeff at January 14, 2020 06:24 PM

December 17, 2019

adafruit industries blog

Bare metal STM32 programming on a quadcopter #Quadcopter #Drone #STM32

Tim Schumacher on timakro.de posts about bare Metal STM32 programming on a Crazepony Mini quadcopter.

Last year I got the Crazepony Mini quadcopter, and just recently I figured out how to program it. I will show my progress in this post, and it will also serve as a getting started guide for programming STM32 microcontrollers. We will build a minimal working example to blink an LED with only the GNU ARM compiler (gcc) and without any library dependencies.

You can get the quadcopter on eBay for around 100 €. It ships with a remote control that wirelessly connects to the drone. Like the drone the remote control has no casing, which I find for the drone looks really good, but unfortunately makes holding the remote control difficult. Both devices have firmware by Crazepony installed for which they published the source on GitHub. They seem to be using the Keil IDE. Although it’s mainly made for educational purpose you can totally fly the quadcopter, and I had fun with it for a while.

The chip on the quadcopter is a 32-bit ARM Cortex-M processor with 64 KiB flash memory. On board are a wireless module, a 3-axis digital compass which detects orientation using the earth’s magnetic field, an altimeter that measures height by air pressure and an accelerometer and gyro sensor combined into one chip. In this post we will be using the LEDs on one of the 4 arms and most importantly the integrated USB to serial bridge to flash our program. You can get the schematic for the quadcopter here.

There are a few ways to flash firmware onto STM32 microcontrollers. You can use one of the debugging interfaces JTAG or Serial Wire Debug (SWD) which also have support for on-chip debugging. Note that SWD despite it’s name does not use the standard serial port of the chip. In fact, using the serial connection also known as UART connection is another and the most basic way to flash the controller. That’s what we will be using.

See the details in the blog post. It is great to be able to hack on these projects!

by Anne Barela at December 17, 2019 07:53 PM

October 27, 2019

Keith’s Electronics Blog

Inserting Weights Into a Print

While designing a (different) small box, I knew I wanted it to have a heavy base to keep it from being tippy. I designed recesses in the base for stacks of electrical box knockouts (that I’d been saving for recycling, because I’m just that way and I can’t help it) and had to look up how to get the printer to pause for me to insert them. Because I am not steady enough to play Operation, the Wacky Doctor Game when the patient is awake and trying to bat away my tools.

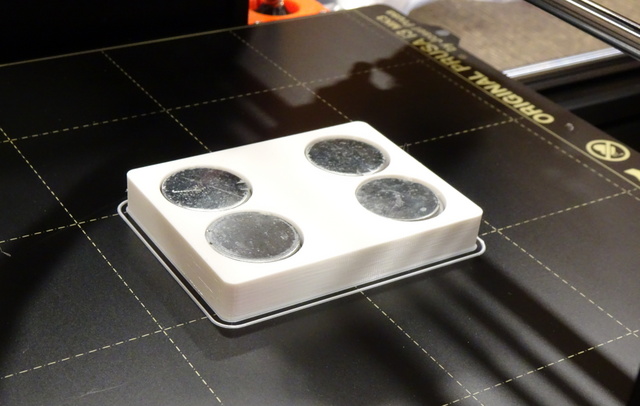
weights inserted into 3D print

In PrusaSlicer, the answer is to slice the object once, then grab the slider to the right of the plater and drag it down to the layer that you want the printer to pause before beginning to print. Hit the + button immediately to the right, telling PrusaSlicer that you want to do a manual filament change to make that layer be a new color, and then reslice. You can verify the pause with the slider; everything below the pause will be shown in one color and everything above in another.

When it finishes the layer below, the printer goes through a superfluous dance of unloading and reloading the filament, but it works out fine.

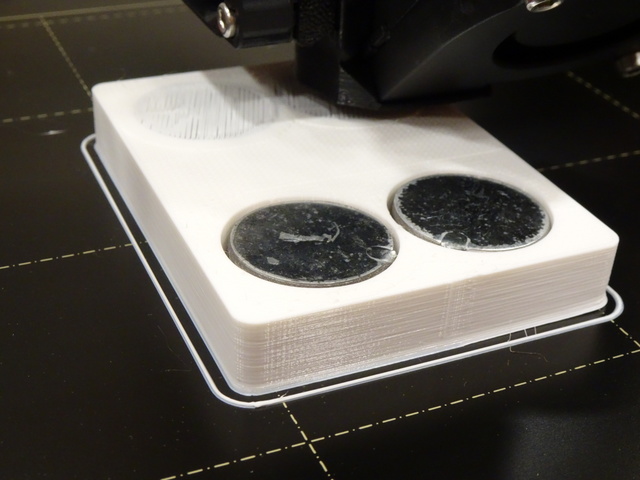
3D printer covering weights inserted into print

After resuming, the printer bridges nicely over the weights, just like it oughtta. Very gratifying.

by Keith Neufeld at October 27, 2019 11:49 PM

PLA Shrinks Too

Everybody all, “ABS bad, it shrink when you print it,” and I’m, “Yo, dog, PLA shrink too.”

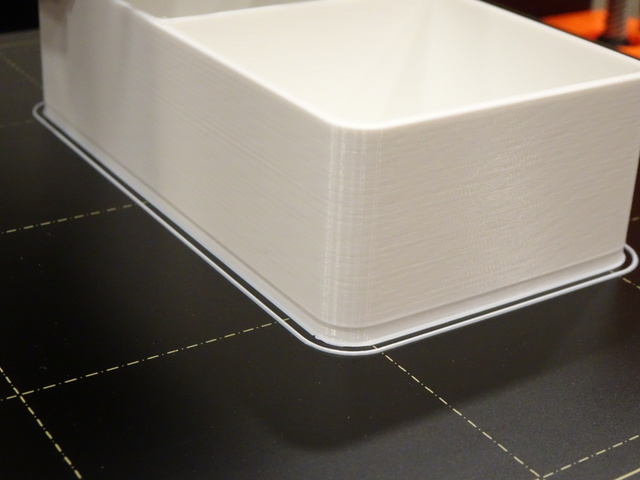
3D-printed PLA box

That’s a box with 2-mm walls and a 2-mm base. Hatchbox PLA. The layers of the base that are not stuck down to the hot build platform shrank right up.

Don’t be up in my grill about PLA being nature’s perfect filament. I need me an enclosure.

by Keith Neufeld at October 27, 2019 11:37 PM

Calibrating Filament Diameter, Nozzle Temperature, and Extrusion Multiplier

With several filaments I’ve used lately, I get a rough surface on the top of my prints that makes me think the printer is depositing too much filament. I took a bit of time today to learn how to calibrate that; and one of the same tutorials gave a nice reference for nozzle temperature calibration, so I did that, too.
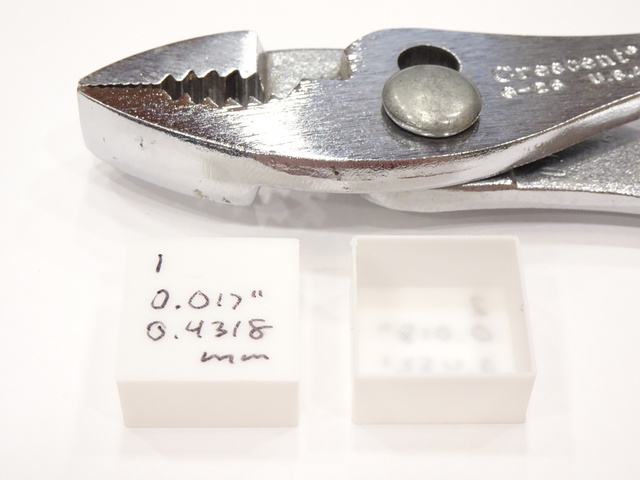
3D printer extrusion multiplier calibration cubes

These notes are as much for me as for thee, as I expect to run through this again with more filaments in the future.

Nozzle Temperature Calibration

I went with the temperature calibration first, as I figured there was at least a chance that the extrusion temperature would impact the amount of die swell as the filament exits the nozzle.

Although I’m using PrusaSlicer (because it’s preset with Prusa’s recommendations for my MK3S), I followed the instructions on Slic3r’s very well-written calibration page. I downloaded heattower.stl from Thingiverse, followed the instructions to temporarily override the amount of infill and number of solid layers, and printed it. During the print, I reduced the temperature 5°C every 5 mm, or thereabouts, by hitting the control panel button, selecting Tune / Nozzle:, and dialing it down.
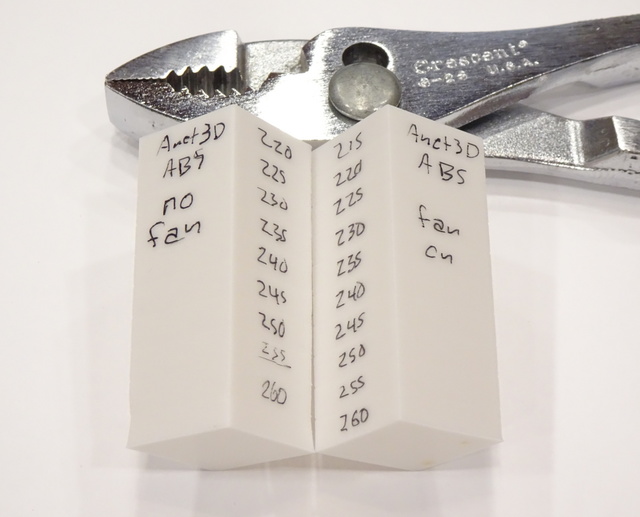
3D printer temperature calibration towers

The first pass produced the lovely squishy-based tower on the left, suggesting that top end of the filament’s recommended range of 230-260°C is too hot and the best printing happens in the lower region of the range. But most of the way through, I realized the part cooling fan wasn’t running because Prusa + ABS; so I changed the PrusaSlicer settings to turn on the fan and repeated the print, giving the clean and tidy tower on the right. With the fan on, I got perfect results throughout the recommended temperature range and a bit of delamination just below the recommended range.

I picked 250°C as a nice value likely to give good laminations and entered it into PrusaSlicers Filament Settings First Layer and Other Layers extruder temperature settings.

I later turned off the part cooling fan because without an enclosure (that I haven’t built yet), it does increase the propensity of the part lifting off the build platform. But I stand by my temperature as a good choice for strong layer adhesion, with or without the fan.

Extrusion Multiplier

I had to read up on the extrusion multiplier. It’s the name given to the amount to scale up or down the rate of filament flow to get the nominal extrusion size. In addition to the Slic3r’s calibration page, it’s also covered in a Prusa article.

Before setting the extrusion multiplier, I checked my filament diameter, as that will impact the rate of flow. I don’t have a two-decimal-point metric caliper, so I measured my filament as 0.070″ diameter at several points along a meter of length. Converting to metric, I got 1.778 mm, which I plugged into PrusaSlicer’s Filament Settings / Diameter value.

Thinking about whether this was a real difference in diameter or the limits of my caliper’s precision, I note that 0.001″ = 0.0254 mm and conclude that this filament really does seem to be measurably thicker than nominal, by about +1.6%. Not a lot, but that would account for some extra filament and crowding in my prints.
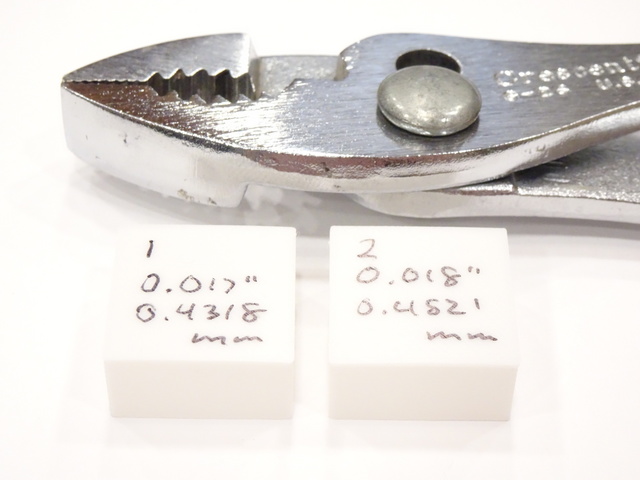
3D printer extrusion multiplier calibration cubes

I then printed the first hollow calibration cube, on the left (shown upside-down for convenience of penmanship), and measured its wall thickness at 0.017″ &approx 0.4318 mm. According to Prusa, this was supposed to come out to 0.45 mm, so I set the Filament Settings / Extrusion Multiplier to 0.45 mm / 0.4318 mm &approx 1.04. I printed the second calibration cube and measured its wall thickness at 0.018″ (paying attention to how close the pointer was to the marks on my caliper dial) &approx 0.4521 mm. That was just larger than it should have been, so I reduced the Extrusion Multiplier to 0.45 mm / 0.4521 mm * 1.04 &approx 1.035 and called it done.

Net Change

I note that increasing the reported filament diameter by 1.6% reduced the flow rate by about 1.5% and then the new extrusion multiplier increased it 3.5% for a net effect of increasing my flow by about 1.9%. That was not the outcome I expected, but I’m sticking with it until I can credibly demonstrate why those changes were incorrect.

by Keith Neufeld at October 27, 2019 11:18 PM

October 15, 2019

adafruit industries blog

Xaxxon announces Open LIDAR as Open Hardware with Open Software #LIDAR #OpenHardware #OpenSource @xaxxontech

The Xaxxon OpenLIDAR Sensor is a rotational laser scanner with open software and hardware, intended for use with autonomous mobile robots and simultaneous-location-and-mapping (SLAM) applications.

The sensor has a simple mechanical design, using the proven Garmin LIDAR-Lite v3 laser distance measurement sensor, wired through a rotational slip ring, with stepper motor drive, two 3D printed frame parts, and an Arduino compatible PCB. Power and communication are delivered via USB cable.

Python ROS drivers and firmware source code are available on our Github. All configuration settings are dynamically tweakable using the rqt_reconfigure GUI tool, which comes standard with all versions of ROS.

The sensor is compatible with Linux, Windows, and MacOS operating systems, running on either x86 or ARM architectures. However, full drivers and support are currently limited to systems running Linux OS with the Robot Operating System (ROS-Inigo/Kinetic/Melodic).

But, communication with host-systems other than Linux/ROS is straightforward using any programming language, thanks to the OpenLIDAR PCB’s simple serial communication protocol.

See the product page for more information and links to source files.


by Anne Barela at October 15, 2019 01:56 PM

August 15, 2019

adafruit industries blog

Betrusted – a cryptoprocessor for your private data #Security #Encryption #Communications @bunniestudios

A new concept debuts as Betrusted. Betrusted is a cryptoprocessor with a dedicated display and keyboard. It’s a protected place for your private matters.

Betrusted ensures that human-readable secrets are never stored, displayed, or transmitted beyond the confines of the betrusted device: betrusted is a security enclave with human-friendly I/O.

Betrusted aims to build a full technology stack, including silicon, device, OS, and UX, that is open for inspection and verification by anyone: experts, governments, and users are free to audit, critique, confirm and improve its ability to keep secrets. You, the user, get to pick which version or provider for betrusted you trust the most. Thus, the only secrets in betrusted are the ones you put in it.

Betrust is not a phone but is designed that it can share a phone case. It will communicate via WiFi.

The administrative contact for the betrusted.io project is the renowned Andrew ‘bunnie’ Huang.

For more information:

by Mike Barela at August 15, 2019 01:59 PM

July 28, 2019

todbot blog

hidapitester – Command-line program to exercise HIDAPI

To help diagnose USB HID communication and to test out updates to hidapi, I wrote hidapitester. It is a command-line program that allows you to exercise just about every aspect of hidapi. Pre-built binaries for MacOS, Windows, and Linux Ubuntu x64. I’ve found it very useful. You can use it to: Scan for connected HID [...]

by todbot at July 28, 2019 12:49 AM

July 27, 2019

todbot blog

HIDPyToy – GUI to test USB HID devices

Here is HIDPyToy. It’s a small app written in PyQt using the hid Python package to talk to USB HID devices (like Teensy RawHID or blink(1) USB RGB LEDs). Pre-build binaries are available for MacOS and Windows. HIDPyToy allows you to exercise pretty much the entire hidapi library from Python. You can: List for all [...]

by todbot at July 27, 2019 04:35 PM

July 02, 2019

adafruit industries blog

How to Make Apple’s Mac Pro Holes @isonno #Apple #MacPro

Via J. Peterson’s blog – Apple’s recently introduced Mac Pro features a distinctive pattern of holes on the front grill… that pattern is very appealing, and re-creating it is a fun exercise.

The best clue about the pattern comes from this page pitching the product. About halfway down, by the heading “More air than metal” is a short video clip showing how the hemispherical holes are milled to create the pattern.

With a bit of trig, you can find half the horizontal spacing x by using the right triangle formed by that line, x and the side of the equilateral triangle. The angle from the vertical center line to the equilateral triangle edge is half of π/3, π/6. So, x=2r tan(π/6) and 2x is the horizontal spacing of the circles.

The blog goes on to use trigonometry to calculate the opposite hole positioning and with some pixel counting, some thickness estimates.

So to CAD this up, all you need to do is start with a rectangular block of thickness t, and use the formulas above to place the centers of the spheres (with diameter 2r) on the front and back of the block.

If you just want to quickly print or look at the result in 3D, there are some sample STL files posted on Thingiverse.

by Mike Barela at July 02, 2019 02:48 PM

June 04, 2019

todbot blog

Oberheim Matrix 6r firmware update!

I upgraded the firmware on my beloved-but-long-unused 1986 Oberheim Matrix 6r! These synths are the royalty of analog fatness. I love their sound. This is the result I was looking for: It’s remarkably clean inside for a machine made in 1986. I acquired it used in the early 90s. Just look at the bank of [...]

by todbot at June 04, 2019 07:58 PM

May 19, 2019

one girl's diary of improvisational engineering

scanlime050 – Perler Bead Shaker

Briefly looking back at an old project where I tried to push the capabilities of the first 3D printer I had, the Makerbot Thing-o-Matic designed in late 2010. This project from 2011 was intended to be a full printer or sort and place machine for fusible “Perler” style plastic art beads. I got as far as designing a vibrating funnel, hopper, and part of a color sorting mechanism.

The old Perler Bead Robot project is still on Thingiverse.

And perhaps more useful is the library for making 2D springs in the same style.

Thank you so much for watching, subscribing, and sharing my videos. And a special thanks to my supporters on Patreon, where recurring donations make this content possible.

For an alternative to youtube and twitch, check out Diode Zone.

If you’d like some of those cool scanlime stickers or Servo AF stream gear, check out the shop.

For previous episodes, check out the full scanlime playlist.

Each episode is compiled together from many livestreams which you can hang out with on the companion scanlime-in-progress channel.

Follow @scanlimelive for live streaming announcements.

by Micah Scott at May 19, 2019 07:44 PM

May 03, 2019

adafruit industries blog

Adafruit AR Update #Electronics #Education #AR #ImageTracking

This week we’ve been testing image tracking on our Adafruit boards…and it was a success! Here’s a snippet of that we’ve done.

After scanning our Circuit Playground Express, we get some board info that pops up along with a Circuit Playground video. This is not a finished product. Much more will be done with this but be sure to let you know when the next Adafruit AR update is released so you can try it yourself!

Stay tuned for more updates!

by Trevor at May 03, 2019 04:01 PM

April 30, 2019

adafruit industries blog

I made a smart watch from scratch #DIY #IoT #Wearables #Makers

By GitHub user S-March/Imgur samsonmarch who made their own smartwatch!

I decided sometime last year that I wanted to make a smart watch from scratch. I am an electrical engineer and product designer by day, so this was a fun side project that had been rolling around in my head for a while now.

Design

I decided early on that I wanted a round watch. I’m not a fan of the square or squarcle watches that seem to be all over these days. Something about that shape felt too 1980’s computer-y to me. From a technical point of view, it is definitely easier to make something that isn’t round. Square screens are much easier to come by and have more space to show you more stuff. The reality, however, is I don’t want another phone or computer on my wrist. I just want something to show me important bits of information when I need them. The shape of this particular watch was primarily driven by the screen I ended up using (which can be found in the bill of materials). It is a teardrop shape, where the actual display is round, but there are some additional electronics parts that add to the size. So you can see above, the square parts on the top and bottom where the band connects to the watch are actually there to hide the bottom of the screen.

3D Printing

I have a little cheap monoprice printer here at home, it is awesome for stuff like this. I printed out the two pieces of the housing I designed above out of a woodfill PLA. What that means, is that the plastic I used to print this out, is actually 70% plastic and 30% saw dust. The cool thing about woodfill plastic, is that it behaves very similarly to actual wood. It sands down really nicely and you can stain it with wood stains! The downside to this particular type of plastic is that when it prints, it leaves a stringy mess on the print that you have to clean up. I use a file and some 220 grit sandpaper to get it started.

The project is full open sourced, the repo has all of the build files you need to make your own: – Circuit board files – Schematics – Bill of Materials – All the code – STL files for all the prints,  all available on GitHub here.

See the Imgur post for additional details. Great job!

by Mike Barela at April 30, 2019 05:52 PM

April 23, 2019

adafruit industries blog

OMIS: An Open Millifluidic Inquiry System for small scale chemical synthesis and analysis #opensource @LabOnTheCheap

OMIS is a 3D tool for performing small-scale chemical synthesis and analysis. The system is Arduino-based and consists of an automated syringe pump run by an inexpensive stepper motor and reaction vessels. The design is meant to allow for fabrication “in one day”, and can pump fluids at rates between 60 and 300 μL/min. we learn from Lab on the Cheap.

The project paper has all the build details and instructions. The Bill of Materials lists the cost at around $250, including the PETG filament for 3D printing. There are CAD designs, electronic schematics, and software including step-by-step assembly pictures in the paper!

The project has a website and GitHub listing resources with the assembly instructions.

For the stepper motor, the paper refers to tutorial work by Adafruit on wiring up a stepper motor to an Arduino. This makes some of the most traditionally difficult steps in setting up a project much easier. Part designs can also be found on Thingiverse, where in the comment system you can see problems others have run into or suggested modifications.

See the video below for some example work and the paper for additional details. And see adafruit.com for stepper motor and other parts and the Adafruit Learning System for free tutorials.

Are you interested in fluidics and pneumatics? Let us know in the comments below.

by Mike Barela at April 23, 2019 02:34 PM

April 10, 2019

adafruit industries blog

NEW GUIDE: Adafruit VEML7700 Ambient Light Sensor #VEML7700 #Sensor #Adafruit @Adafruit @VishayIndust

New in the shop: The Adafruit VEML7700 I2C Lux LighT Sensor Breakout Board.

Vishay has a lot of light sensors out there, and this is a nice simple lux sensor that’s easy to add to any microcontroller. Most light sensors just give you a number for brighter/darker ambient lighting. The VEML7700 makes your life easier by calculating the lux, which is an SI unit for light. You’ll get more consistent readings between multiple sensors because you aren’t dealing with some unit-less values.

The sensor has 16-bit dynamic range for ambient light detection from 0 lux to about 120 klux with resolution down to 0.0036 lx/ct, with software-adjustable gain and integration times.

Interfacing is easy – this sensor uses plain, universal I2C. We put this sensor on a breakout board with a 3.3V regulator and logic level shifter so you can use it with 3.3V or 5V power/logic microcontrollers. We have written libraries for Arduino (C/C++) as well as CircuitPython (Python 3) so you can use this sensor with just about any kind of device, even a Raspberry Pi!

This is Kattni’s first PCB design for Adafruit, it’s even signed on the back!

Get one in the Adafruit shop now – in stock and shipping!

by Mike Barela at April 10, 2019 05:35 PM

April 02, 2019

adafruit industries blog

51 years ago today – 2001: A Space Odyssey Debuts #Movies #Space

Today in 1968, Stanley Kubrick’s ‘2001: A Space Odyssey’ premiered at the Uptown Theater in Washington, DC.

2001: A Space Odyssey is a 1968 epic science fiction film. The screenplay was written by Kubrick and Arthur C. Clarke, and was inspired by Clarke’s short story “The Sentinel“. The film, which follows a voyage to Jupiter with the sentient computer HAL after the discovery of a mysterious black monolith affecting human evolution, deals with themes of existentialism, human evolution, technology, artificial intelligence, and the possibility of extraterrestrial life. The film is noted for its scientifically accurate depiction of spaceflight, pioneering special effects, and ambiguous imagery.


This painting by artist Robert McCall was used in one of the movie’s promotional posters (McCall/MGM).

Many makers have recreated the interface to HAL (below). While Replica Prop Forum members make “screen accurate versions”, one can get pretty close on a budget like in this Adafruit tutorial.

See the original trailer below.

Are you a 2001 or Arthur C. Clarke fan? Let us know in the comments below.

by Mike Barela at April 02, 2019 02:42 PM

March 29, 2019

adafruit industries blog

Adafruit AR Update #Electronics #Education #AR

We’ve just uploaded our PyPortal to the Adafruit AR scanner!

Here, we are tracking a QR code image displayed on an invoice to plant our Adafruit PyPortal on top of. We’ve added an in app video of the PyPortal for you to watch in AR and a link to the PyPortal learn guide.

We’ve also added the Circuit Playground video “Q for Quartz” to the video portion of the app! 😃

Hey, did you know we have our own AR app? Well, now you know! Download our free Adafruit AR in the App Store today, click here! Who doesn’t’ like free stuff?

Download now to play with Adabot, you electronic’s assistant and watch Circuit Playground videos in AR!🤖

by Trevor at March 29, 2019 05:43 PM

March 19, 2019

code, circuits, & construction

MKR GSM 1400 Pre-flight Checklist

I’ve been getting to know the MKR GSM 1400 boards better the past few days, and in the process I’ve assembled a “pre-flight checklist” of things you’ll want to do first, in order to make sure everything is ready to … Continue reading

by tigoe at March 19, 2019 02:02 PM

March 15, 2019

adafruit industries blog

Adafruit AR Update #Electronics #Education #AR #ios

Have you checked out our new PyPortal? We are currently adding the PyPortal to our Adafruit AR app and creating a new QR code for our PyPortal invoices.

We’ve also added the Circuit Playground video “Q for Quartz” to the video portion of the app! 😃

Hey, did you know we have our own AR app? Well, now you know! Download our free Adafruit AR in the App Store today, click here! Who doesn’t’ like free stuff?

Download now to play with Adabot, you electronic’s assistant and watch Circuit Playground videos in AR!🤖

by Trevor at March 15, 2019 03:19 PM

February 10, 2019

adafruit industries blog

Adafruit Weekly Editorial Round-Up: Valentine’s Day, CircuitPython 2019, and more

INewImage 21 1 1


ADAFRUIT WEEKLY EDITORIAL ROUND-UP


We’ve got so much happening here at Adafruit that it’s not always easy to keep up! Don’t fret, we’ve got you covered. Each week we’ll be posting a handy round-up of what we’ve been up to, ranging from learn guides to blog articles, videos, and more.


BLOG

Theres still time to give give t

Valentine’s Day is just around the corner so you may be wondering what to get for that special someone(s). It can be tricky picking out the perfect gift. Read more.

More BLOG:


LEARN

Rose’s Shield – Steven Universe by the Ruiz Brothers

Build Rose’s shield from Steven Universe! This shield lights up and makes sound effects when it takes a hit. It’s about 20-inches in diameter and completely made from foam boards. We used two 20×30 inch foam board to create this massive shield. Learn more.

More LEARN

Browse all that’s new in the Adafruit Learning System here!

by Kelly at February 10, 2019 08:00 PM

February 08, 2019

adafruit industries blog

Augmented Reality Hand Puppet #AR iOS

via Twitter

Check out this cool video of augmented reality hand puppet app. This tech may bring forth a sign language translator. Only time will tell…either way this project is pretty awesome. This could be great tool for digital puppetry!

Built by Hart Woolery at @2020CV using #CoreML, #ARKit, #Keras and #TenorFlow.

by Trevor at February 08, 2019 03:00 PM

February 07, 2019

one girl's diary of improvisational engineering

scanlime049 – iCEBreaker FPGA Quick Look

Today’s video is about a package sent in by 1BitSquared with a prototype FPGA board. These boards are part of a new generation of open hardware which builds on a foundation of open source FPGA tools. At the time we streamed this live, the crowdfunding campaign was about to launch. It’s been successfully funded, and at this time you can pre-order boards from the next batch.

scanlime049 – iCEBreaker FPGA Quick Look

The iCEBreaker page is on Crowd Supply.

Thank you so much for watching, subscribing, and sharing my videos. And a special thanks to my supporters on Patreon, where recurring donations make this content possible.

For an alternative to youtube and twitch, check out Diode Zone.

If you’d like some of those cool scanlime stickers or Servo AF stream gear, check out the shop.

For previous episodes, check out the full scanlime playlist.

Each episode is compiled together from many livestreams which you can hang out with on the companion scanlime-in-progress channel.

Follow @scanlimelive for live streaming announcements.

by Micah Scott at February 07, 2019 04:47 AM

February 06, 2019

one girl's diary of improvisational engineering

scanlime048 – Icestudio LED Matrix Driver Part 4

In the fourth and final part of our HUB75-style display driver series, we make a cool demo in gateware using the modular driver! In this segment we’ll add a frame buffer and implement a video feedback plus munching squares effect in Verilog and Icestudio.

scanlime048 – Icestudio LED Matrix Driver Part 4

The Icestudio editor and the entire build toolchain are free and open source software!

The FPGA board and adapter PMOD are part of the iCEBreaker CrowdSupply campaign, which was successfully funded! This is a great little FPGA dev board, and a platform designed to help more people get started with FPGAs using open source tools.

This project is available on Github.

Thank you so much for watching, subscribing, and sharing my videos. And a special thanks to my supporters on Patreon, where recurring donations make this content possible.

For an alternative to youtube and twitch, check out Diode Zone.

If you’d like some of those cool scanlime stickers or Servo AF stream gear, check out the shop.

For previous episodes, check out the full scanlime playlist.

Each episode is compiled together from many livestreams which you can hang out with on the companion scanlime-in-progress channel.

Follow @scanlimelive for live streaming announcements.

by Micah Scott at February 06, 2019 01:40 AM

February 04, 2019

adafruit industries blog

Mouth-controlled Synthesizer #MusicMonday

via The Verge

I came to the NAMM show for the music, and boy, did I ever get it. Outside the Anaheim Convention Center where NAMM is taking place, a genial gent calling himself Lordblobbieand wearing heart-shaped sunglasses is playing a thrillingly unique instrument called the Soma Pipe. The Pipe works with a contact microphone to let its user generate a bewildering array of sounds just with his mouth, breath, and a few modulation dials. I’m not kidding. In the video above, Lordblobbie goes through the full range from laser beams and bird chirps to beatboxing, drums, and whale noises. It’s. A. Trip

The Pipe is the brainchild of a Russian inventor called Vlad Kreimer. It has 12 different preset modulation algorithms, including ones named Orpheus, Octava, Pulse, and Harcho, along with three varieties of Bassdrum. Lordblobbie, real name Robbie Kirkhuff, tells me it took years for him to convince Vlad to sell him one of these Pipes. The cost of this extremely unusual synthesizer is $600, and by the looks of things, each one is manufactured to order. (As a neat personal gesture, Vlad signed the interior of Robbie’s Pipe).

See and hear more!

by Zay at February 04, 2019 10:00 AM

January 04, 2019

adafruit industries blog

Gary Oldman is narrating David Bowie’s “David Bowie is” AR App

On Tuesday, the David Bowie Is app will be available for purchase on iOS and Android devices, and serving as its digital tour guide will be none other than Oscar-winning actor Gary Oldman. It’s a fitting choice, as Oldman and Bowie were pals, having both starred in Julian Schnabel’s 1996 film Basquiat. Oldman, too, was featured in Bowie’s music video for “The Next Day.”

via Consequence Of Sound

David Bowie is, the record-breaking exhibition presenting the life and work of one of the most influential performers in cultural history, has been granted digital immortality. On the 72nd anniversary of Bowie’s birth, the David Bowie is AR application launches on iOS and Android platforms.


by Trevor at January 04, 2019 04:59 PM

October 30, 2018

adafruit industries blog

Switch Trinket M0 “Modchip” Install #Trinket

Switch Trinket M0 "Modchip" Install

Post by  on imgur – using the Adafruit Trinket M0 to talk to a Nintendo Switch as a “modchip”. Now ignorant editor me will say “I don’t know about such mods but at least in the US they just ruled that we have the right to repair our gear” so I’d guess this is a repair. As with any repairs not put out by Adafruit, you’re on your own on this. Now Noah writes:

This is the guide I got a lot of info from here. I had this planned out before I stumbled upon this, but it was a huge help to have a list of probe points to tap into on the Switch motherboard. This thread is awesome and a great help if you decide to this yourself and run into issues. “Nintendo Switch modchip install cause I’m bored and have nothing else to do.”

See the entire repair on imgur.

by Mike Barela at October 30, 2018 03:50 PM

October 25, 2018

adafruit industries blog

400 badges MADE IT! Hackaday Superconference @hackaday @hackadayio@digikey #supercon @adafruit

400-1

Badges

400 of these hackable Python powered devices arrived, TODAY for the Hackaday Superconference | Pasadena Nov 2-4 2018. Adafruit is sponsor. Special thanks to Digi-Key for helping us make this happen!

Batts
The badges made it to CA, the 400 batteries are being ground-shipped and will arrive early next with plenty-o-time to spare!

For all our badges, we keep a repo’ on GitHub, here’s what is on the hackaday badge.

The Hackaday Superconference is the greatest gathering of hardware hackers, builders, engineers and enthusiasts in the world.

Supercon 2018 is 3 full days! Join us November 2-4 (2018) in Pasadena, CA. The conference begins on Friday, November 2nd at 10 am with workshops and badge hacking. Supercon attendees are also invited to celebrate with drinks and appetizers at our kick-off celebration at Supplyframe headquarters that Friday (November 2nd) evening.

The complete schedule is up and it is incredible!

Get your tickets now!

by phillip torrone at October 25, 2018 11:42 PM

October 24, 2018

adafruit industries blog

#Crickit Critters for Halloween!

Peep these spooky adorable #Crickit critters! 🎃 👻🤖😈👹💀 – even #trashbots can go trick or treating!

by Kelly at October 24, 2018 05:32 PM

September 21, 2018

adafruit industries blog

Download Adafruit AR in the App Store! #AR @adafruit #iOS @apple

We are currently experimenting with QR Codes and AR. Here in this video, we are using the image tracking framework to track the QR code image and position to plant a Adafruit HalloWing M0 Express model on top of it.

Stay tuned for more to come💀

Have you downloaded our AR app yet? Well, what are you waiting for?☺ Download our free Adafruit AR in the App Store today, click here! Who doesn’t’ like free stuff? 

Check back to the Adafruit Blog for all Adafruit AR news and updates. 🤖

by Trevor at September 21, 2018 07:06 PM

September 19, 2018

adafruit industries blog

‘conserve the sound’ – listen to sounds made by vintage technology | #history #retro #retrotech

CTS (conserve the sound) is a collection of audio recordings of Sony walkmans, VHS decks, mechanical film shutters, actual typewriters, and the like. And yes that includes the sound made by opening a paper map! We all have our stories of yesteryear’s technology – CTS is the sounds we used to hear!

For example can you guess what this is:

(the answer will surprise you!)

»Conserve the sound« is an online museum for vanishing and endangered sounds. The sound of a dial telephone, a walkman, a analog typewriter, a pay phone, a 56k modem, a nuclear power plant or even a cell phone keypad are partially already gone or are about to disappear from our daily life.

Accompanying the archive people are interviewed and give an insight in to the world of disappearing sounds.

»Conserve the sound« is a project form CHUNDERKSEN and is funded
by the Film & Medienstiftung NRW, Germany.

Currently »Conserve the sound« is continuously extended.

We welcome suggestions in general, sound suggestions, stories,
anecdotes and of course collaborations.

via:

[hat tip to David S for the tweet heads up!]

by nicknormal at September 19, 2018 02:06 PM

September 10, 2018

adafruit industries blog

September 07, 2018

adafruit industries blog

Download Adafruit AR in the App Store! #AR @adafruit #iOS @apple #Cricket


We have a new update still in beta but here’s a quick sneak peek at what we are working on😉.

Here we are using Arkit’s image tracking framework to display a 3D model of a Circuit Playground mounted on top of an Adafruit Circket rotating over a picture of a cat. More updates soon!

Have you downloaded our AR app yet? Well, what are you waiting for?☺ Download our free Adafruit AR in the App Store today, click here! Who doesn’t’ like free stuff? 

Check back to the Adafruit Blog for all Adafruit AR news and updates. 🤖

by Trevor at September 07, 2018 06:13 PM

August 29, 2018

adafruit industries blog

Farmers are Turning to Lasers – Beginning with 4AM Laser Light Shows! – to (Silently) Repel Pesky Birds | #publicradio

Originally heard this report via WNYC AM820 in NYC — listen:

During every berry-picking season in the Pacific Northwest, blueberry and raspberry growers fight to prevent birds from gobbling up the crop before harvest. This year, some farmers are trying something new to scare away the thieving birds: lasers.

Justin Meduri manages a large blueberry farm and cherry orchard outside Jefferson, Ore. Birds like both fruits.

“Flocks can move in of up to 2,000 to 3,000 starling birds,” Meduri says. The starlings gorge themselves and knock down berries right as the crop is ready to pick. When he didn’t take countermeasures, Meduri says the damage was “Inconceivable, huge. We had almost a 20 to 25 percent, maybe even 30 percent damage loss.”

Meduri says he previously hired a falconer to protect his fields. But the falcons were expensive, temperamental and sometimes flew away. Then last year, he became one of the first farmers in the U.S. to install automated lasers.

“You’re creating this kind of laser light show at 4 o’clock in the morning,” Meduri says. “That’s the time when birds come out.”

The lasers cross over in erratic patterns. The sweeping green laser beams emanate from what look like security cameras atop metal poles.

They also work during the daytime. But in sunlight, the human eye can only see green dots dancing across the berry-laden bushes.

Read more here.

by nicknormal at August 29, 2018 05:37 PM

August 27, 2018

adafruit industries blog

State And Events In CircuitPython: Part 1: Setup #CircuitPython

A really interesting and thorough article by Josh Johnson on the Collected Works of jjmojojjmojo blog. Josh states:

This is the first article in a series that explores concepts of state in CircuitPython.

In this installment, we discuss the platform we’re using (both CircuitPython and the Adafruit M0/M4 boards that support it), and build a simple circuit for demonstration purposes. We’ll also talk a bit about abstraction.

This series is intended for people who are new to Python, programming, and/or microcontrollers, so there’s an effort to explain things as thoroughly as possible. However, experience with basic Python would be helpful.

The article goes in-depth about Adafruit’s CircuitPython compatible boards and demonstrates connecting external buttons to several boards. Great series, we look forward to more.

CircuitPython Boards by Adafruit


by Mike Barela at August 27, 2018 08:15 PM

August 10, 2018

code, circuits, & construction

HTML Interface For a Digital Multimeter

It’s been a long time since my last post on this site. Time to update it a bit. Introduction Recently, some colleagues of mine and I were looking for a digital multimeter that could be used by people with low … Continue reading

by tigoe at August 10, 2018 05:18 PM

August 04, 2018

adafruit industries blog

NYTimes on the ‘Evolution’ of Robotic Hands | #robots #ArtificialIntelligence

The New York Times take an interesting look at How Robot Hands Are Evolving to Do What Ours Can. They broke down the hands they looked at to Spinner, Gripper, Picker, Bed Maker, Pusher, and finally take a look at the future of it all. (Unfortunately things like soft robotics aren’t really examined at all. But the article does contain a bunch of neat quick video clips like those below.)

Robotic hands could only do what vast teams of engineers programmed them to do. Now they can learn more complex tasks on their own.

A robotic hand? Four autonomous fingers and a thumb that can do anything your own flesh and blood can do? That is still the stuff of fantasy.

But inside the world’s top artificial intelligence labs, researchers are getting closer to creating robotic hands that can mimic the real thing.


by nicknormal at August 04, 2018 12:17 PM

July 15, 2018

adafruit industries blog

Adobe redesigned the Terminator’s iconic interfaces for today

Via FastCompany

The Terminator franchise is remembered for its incredible direction, strange moments of robotic perspective, and landmark special effects. Take the liquid metal T-1000 robot that was able to melt its way through gaps in bars or holes in windows. It was one of the first uses of computer-generated graphics on film, and yet it was so artfully executed that it will still give you shivers when rewatching the film today.

The movie’s interfaces, in particular, are some of the most iconic in film history. So, when Adobe was searching for a project to advertise the capabilities of Adobe XD, its free UX/UI prototyping software, the company quickly honed in on the idea of redesigning a few of the 1991 film’s on-screen interfaces. Specifically, Adobe wanted to update Terminator 2′s first-person HUD, or heads-up display, which is used by Arnold Schwarzenegger’s T-800, with a more contemporary aesthetic as a way of showing off the power of XD. To stack the deck in its favor, Adobe hired Territory Studios, known for designing UIs in sci-fi films like Avengers: Infinity War and Blade Runner 2049, to collaborate on the project.

Adobe licensed two specific frames to redesign, each of which features the red-tinted point of view of a killer robot attempting to make sense of the world around it. If you remember Terminator 2, the T-800 lands naked in the modern day and begins scanning for clothing and a sick ride. Nonsense numbers fill one corner of the Terminator’s screen, while the interface outlines shapes of objects for identification. This classic footage is really a beautiful play to signal computer vision to the audience, and not all that different from the bounding boxes that companies use to train vision AIs of today.

“The originals we saw as defined by the outline. We didn’t want to lose that outline,” says Marti Romances, creative director and cofounder of Territory Studios. “There’s some stuff on the sides [of the interface] we added as what if we could have more info than just the model. Fuel, things like this. It was just trying to give it a modern take of what they did on the original film.”

See more!

by Jessie Mae at July 15, 2018 08:00 AM